Initial Contact and Assessment Scheduling
When you call a mold remediation company, the first conversation focuses on understanding the scope of your problem. The intake specialist will ask about visible mold locations, recent water damage, musty odors, and any health symptoms your household has experienced. You'll schedule an on-site assessment — typically within 24-48 hours for urgent situations like post-flood contamination.
In Texas, the assessment must be performed by a TDLR-licensed Mold Assessment Technician or company, separate from whoever will perform the actual remediation work.[1] This regulatory separation ensures an unbiased evaluation.
You can verify any company's license status at tdlr.texas.gov/mol/mol.htm before scheduling.
If you're dealing with an active water intrusion — a burst pipe, roof leak, or flooding — the company may dispatch an emergency team for containment and structural drying before formal assessment. Stopping the moisture source immediately prevents mold from spreading while you wait for the full inspection.
Professional Mold Inspection

The inspector arrives with moisture meters, thermal imaging cameras, and air sampling equipment. They'll measure moisture levels in walls, floors, and ceilings — critical in Texas homes where slab-on-grade construction hides plumbing leaks beneath the foundation.
Expansive clay soil in Houston, Dallas-Fort Worth, and San Antonio causes foundation movement that cracks slabs and pipes, creating persistent moisture intrusion that feeds hidden mold growth.
The inspector documents every affected area with photographs and moisture readings. They'll check HVAC systems (a top mold source in Texas since air conditioners run 8+ months per year), attic spaces, crawl spaces in older pier-and-beam homes, and behind walls in bathrooms and kitchens. Air samples and surface swabs go to a laboratory for species identification and spore concentration analysis.
Expect the inspection to take 1-3 hours depending on your home's size and contamination extent. The inspector identifies not just where mold is growing, but why — the moisture source that allowed it to thrive. A hidden toilet flange leak, condensation in ductwork, or inadequate bathroom ventilation all require different remediation strategies.
The Written Mold Assessment Report
Within 3-5 business days, you'll receive a detailed assessment report. This document outlines contamination levels (categorized as less than 10 square feet, 10-100 square feet, or greater than 100 square feet per EPA and OSHA guidelines), identifies mold species found, and maps affected areas.[1][3]
The report includes a remediation protocol — a step-by-step plan for safely removing mold and preventing recurrence.
This protocol dictates containment methods, required personal protective equipment (PPE), materials that must be removed versus cleaned, and clearance testing requirements. In Texas, only the licensed assessor can write this protocol, and the remediation company must follow it exactly.
You'll see laboratory results showing which mold species were identified. While the term "toxic mold" gets thrown around loosely, species like Stachybotrys chartarum (black mold) do produce mycotoxins that warrant aggressive remediation. The report will also specify moisture levels found — anything above 16% in wood or 2% in drywall indicates conditions that support active growth.
For homes where contamination exceeds 100 contiguous square feet (OSHA Level IV), expect the protocol to require engineering controls, full containment, negative air pressure, and potentially duct cleaning or HVAC replacement.[3]
This is where many Texas homeowners discover the true extent of damage — what looked like a small bathroom problem turns out to involve wall cavity mold removal and drywall replacement.
What Your Mold Assessment Report Should Include:
- Contamination size category (under 10 sq ft, 10-100 sq ft, or 100+ sq ft)
- Laboratory results identifying specific mold species present
- Moisture readings for all affected building materials
- Detailed remediation protocol with step-by-step procedures
- Maps and photographs documenting all affected areas
- Root cause analysis identifying the moisture source
- Clearance testing requirements for project completion
Getting Remediation Quotes and Scheduling
Armed with the assessment report, you'll contact TDLR-licensed Mold Remediation Companies for quotes. In Texas, the remediation company cannot be the same entity that performed your assessment — this prevents conflicts of interest. Expect quotes from 2-3 companies, comparing not just price but scope of work, timeline, and what's included in restoration.
Remediation quotes typically break down by labor, materials, equipment rental (air scrubbers, dehumidifiers, negative air machines), disposal fees, and restoration costs. The restoration phase — replacing drywall, repainting, reinstalling insulation — often doubles the total project cost but isn't always itemized separately.
Ask whether the company handles both remediation and restoration or if you'll need to coordinate a separate contractor.
Timeline matters as much as price. Most residential projects take 3-7 days for the remediation phase once work begins, but full restoration can extend that to 2-3 weeks.[4] If you're working with insurance, the remediation company may coordinate directly with your adjuster and provide documentation required for claims. For complex scenarios, read more about insurance claim mold services to understand what's covered.
Check that the company carries general liability, pollution liability, and professional liability insurance — TDLR requires proof of coverage for licensing. Also verify they employ licensed Mold Remediation Workers, not just subcontractors. You want a crew trained in proper containment, safe handling of contaminated materials, and Texas-specific building codes.
Pre-Remediation Preparation
Before the crew arrives, you'll need to prepare your home. The remediation company will provide specific instructions, but expect to:
- Remove furniture, electronics, and personal belongings from affected areas and adjacent rooms
- Clear pathways for equipment access and material removal
- Relocate pets and inform neighbors about the work (containment systems can be loud)
- Shut off HVAC systems if ductwork is affected or if cross-contamination is a risk
For whole-house contamination or situations where attic mold removal is involved, you may need to temporarily relocate. Air scrubbers and negative air machines create noise and strong airflow that make living conditions uncomfortable.
If mold levels are high or someone in the household has respiratory sensitivities, relocation isn't just recommended — it's necessary for health protection.
The company will establish containment barriers using polyethylene sheeting to isolate work areas from the rest of your home. In Texas homes with open-concept floor plans common in post-2000 construction, this often means sealing off large sections of the house. HEPA-filtered negative air machines pull air from the containment zone and exhaust it outside, preventing spore migration during demolition.
Moisture Source Repair and Structural Drying
Mold remediation will fail if the moisture source isn't fixed first.
This is the step homeowners wish they'd understood earlier — you can remove every visible spore, but if water keeps feeding the area, mold returns within weeks.
The remediation crew or a coordinated plumber/roofer addresses the underlying problem. Common culprits in Texas include:
- Slab leaks: Plumbing running beneath concrete foundations corrodes from hard water (150-300+ ppm calcium in most Texas cities). Repiping may be necessary.
- Foundation cracks: Expansive clay soil swells when wet and shrinks when dry, cracking slabs and allowing groundwater intrusion. Foundation repair prevents recurring moisture.
- HVAC condensation: Drain pan overflow, disconnected condensate lines, or duct condensation from running AC systems nearly year-round.
- Roof leaks: Especially after severe storms or hail damage (a persistent issue in North Texas during spring storm season).
- Bathroom/kitchen leaks: Toilet flanges, shower pan failures, or dripping supply lines hidden behind walls.
Once leaks are repaired, structural drying begins. Industrial dehumidifiers and air movers run continuously to pull moisture from building materials. Moisture meters confirm that wood framing drops below 16% and drywall below 2% — the thresholds where mold cannot sustain growth.
This phase typically takes 2-4 days depending on saturation depth and materials affected.
| Moisture Source | Typical Repair Method | Average Timeline | Prevention Strategy |
|---|---|---|---|
| Slab Leak | Reroute or repipe plumbing above-grade | 2-5 days | Annual plumbing inspections; water pressure regulation |
| Foundation Crack | Foundation stabilization/pier installation | 1-3 weeks | Proper drainage; moisture-controlled soil around perimeter |
| HVAC Condensation | Drain line clearing/replacement; pan replacement | 1-2 days | Quarterly condensate line maintenance; float switch installation |
| Roof Leak | Shingle/flashing repair or replacement | 1-3 days | Annual roof inspections; post-storm assessments |
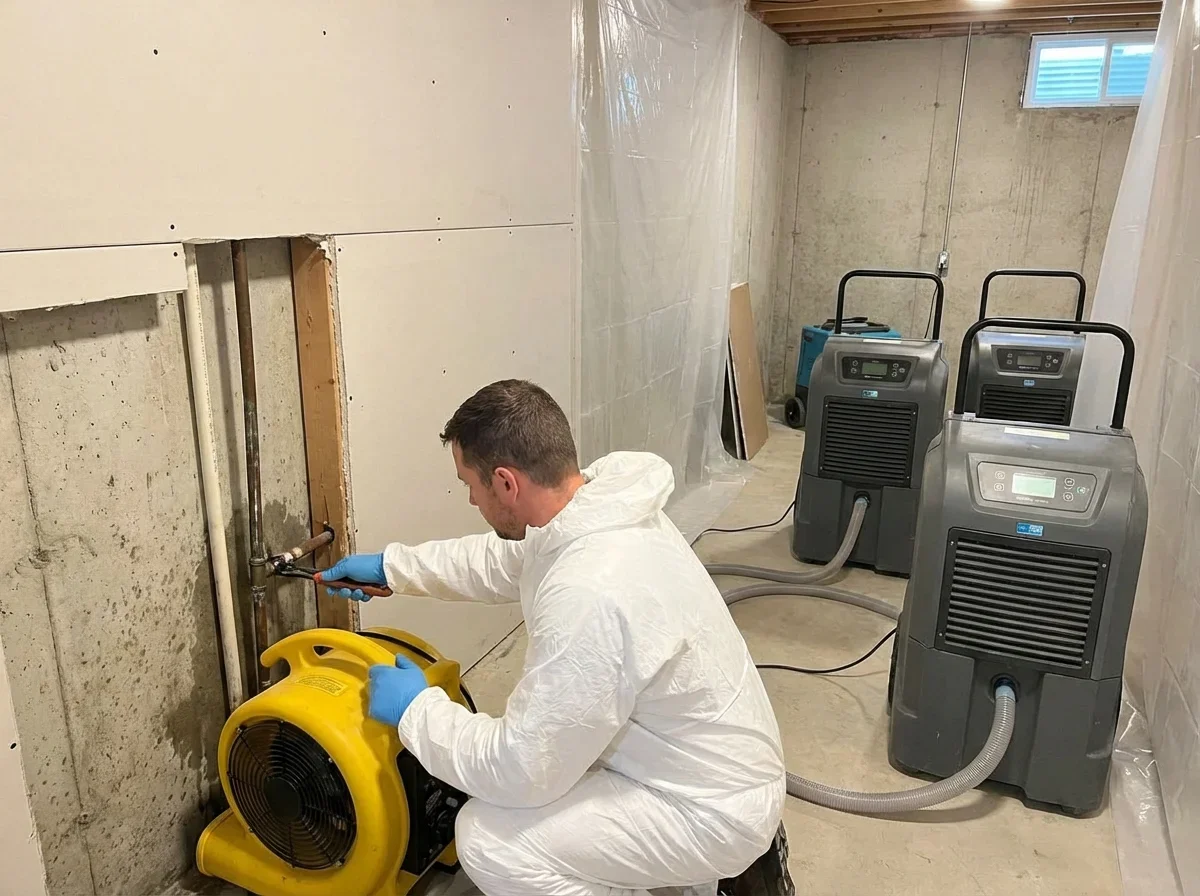
Containment and Negative Air Pressure Setup
With the moisture source fixed and materials drying, the crew establishes full containment. For projects over 100 square feet, OSHA guidelines require sealed barriers, airlocks for entry/exit, and negative air pressure maintained at all times during demolition.[3]
Polyethylene sheeting seals doorways, vents, and any openings between the work zone and occupied spaces. HEPA-filtered negative air machines (rated to capture 99.97% of particles 0.3 microns or larger) create lower air pressure inside the containment area. This ensures that any airborne spores released during removal get pulled through the HEPA filter and exhausted outdoors, not pushed into clean areas of your home.
You'll see crew members entering and exiting through airlocks — double layers of plastic sheeting that minimize air exchange. They'll wear PPE including N95 or P100 respirators, gloves, disposable coveralls, and eye protection. For Level IV remediation (over 100 square feet), full-face respirators and Tyvek suits are standard.[3]
This setup looks dramatic, but it's essential for protecting both your household and the workers.
Disturbing mold colonies during demolition releases massive spore counts — orders of magnitude higher than the levels you were breathing before remediation started. Proper containment keeps that spike isolated.
Removal of Contaminated Materials
Mold doesn't just sit on surfaces — it penetrates porous materials. The EPA guidelines are clear: porous materials like drywall, insulation, ceiling tiles, and carpet must be discarded if contaminated, not cleaned.[2]
This is where many Texas homeowners face sticker shock. What looked like surface mold on a bathroom wall becomes a full drywall tearout extending several feet beyond visible growth.
The crew carefully removes affected materials to minimize spore disturbance. Misted surfaces (lightly sprayed with water or biocide) reduce airborne release during cutting and bagging. Contaminated debris goes directly into heavy-duty polyethylene bags, sealed on-site, and disposed of according to local waste regulations. In Houston and other major metros, debris must be labeled and taken to approved disposal facilities.
For items that can be salvaged — non-porous surfaces like metal, glass, tile, or sealed wood — the crew scrubs them with detergent and water, then treats with EPA-registered antimicrobials.[2] Hard surfaces get HEPA-vacuumed before wet cleaning to capture loose spores. After cleaning, surfaces are dried completely and inspected under bright lighting for any remaining growth.
The crew also addresses HVAC systems if contamination spread through ductwork. In Texas homes where air conditioning runs April through November, mold in ducts can distribute spores house-wide. HVAC mold removal may involve duct cleaning, coil treatment, or complete system replacement depending on severity.
HEPA Vacuuming and Surface Cleaning
Once contaminated materials are removed, HEPA vacuuming captures residual spores from all surfaces in the contained area — walls, ceilings, floors, studs, joists, and subfloors. This step is critical and time-intensive. The crew vacuums every exposed surface multiple times, working systematically from top to bottom.
After vacuuming, surfaces are wiped down with damp cloths and EPA-registered biocides or antimicrobial solutions. The goal isn't to sterilize (impossible in a home environment) but to reduce spore counts to levels comparable to outdoor air and eliminate conditions that support regrowth.
Detergent-and-water scrubbing is often sufficient for hard surfaces; biocides are reserved for areas with heavy growth or high moisture risk.[2]
In older Texas homes with pier-and-beam construction, the crew may treat crawl spaces with encapsulation membranes after cleaning. This vapor barrier prevents ground moisture from re-entering the structure — a must in East Texas Piney Woods regions where sandy loam soils retain moisture. For slab-on-grade homes, subfloor treatments and vapor barrier installation may be necessary if moisture penetration was severe.
The cleaning phase can take 1-2 days for moderate contamination. For whole-house scenarios or post-flooding situations (common after Gulf Coast hurricanes), expect longer timelines. You can learn more about recovery strategies in our guide to post-flood mold prevention.
Application of Antimicrobial Treatments
After cleaning, the crew applies EPA-registered antimicrobial or fungicidal treatments to affected areas. These products inhibit future mold growth on treated surfaces, buying time for building materials to fully dry and for moisture management improvements (better ventilation, dehumidifiers) to take effect.
Common treatments include quaternary ammonium compounds, hydrogen peroxide-based solutions, or botanical antimicrobials. The crew applies them via spray, fog, or direct application depending on the product and surface type. In Texas, where humidity spikes during May-October hurricane season, antimicrobial treatments are especially valuable in bathrooms, kitchens, and laundry rooms — the areas most prone to recurring moisture.
Encapsulants — sealant coatings applied over cleaned surfaces — are sometimes used in areas where complete material removal wasn't feasible. Mold encapsulation locks remaining spores in place and creates a moisture-resistant barrier. This approach is more common in commercial settings or historic buildings where structural elements can't be replaced, but it's occasionally used in residential crawl spaces or attics.
Antimicrobials are a supplement to proper moisture control, not a replacement.
If your home still has high humidity, poor ventilation, or unresolved leaks, mold will return despite treatment. The crew should explain what moisture management steps you'll need to take post-remediation — dehumidifiers, exhaust fans, routine HVAC maintenance — to prevent recurrence.
Post-Remediation Verification and Clearance Testing
Once remediation is complete, a TDLR-licensed Mold Assessment Consultant (independent from the remediation company) returns for clearance testing. This isn't optional — Texas regulations require independent verification that remediation met the protocol outlined in the original assessment.
The consultant performs visual inspection and collects post-remediation air samples from the treated area and a control area (an unaffected part of your home). These samples go back to the laboratory for spore count and species analysis. Clearance is granted when post-remediation spore counts are at or below outdoor air levels and comparable to the control area.
If elevated counts persist, the remediation company must return and perform additional cleaning until clearance is achieved. You don't pay extra for this — it's their responsibility to meet the protocol.
Clearance testing typically takes 3-5 business days for lab results, so factor this into your timeline if you're waiting to reoccupy the home.
You'll receive a written clearance letter documenting that remediation was successful. This letter is critical for insurance claims, real estate transactions, and your own records. Keep it with your home documents — future buyers or tenants may ask for proof that mold was properly addressed. For more on what these reports contain, see our article on understanding your mold assessment report.
Pro Tip: Don't reoccupy treated areas until you have the written clearance letter in hand. Some homeowners return early to speed up restoration work, but this exposes you to potentially elevated spore counts if additional cleaning is needed. The few days of waiting are worth protecting your health and ensuring the job was done right the first time.
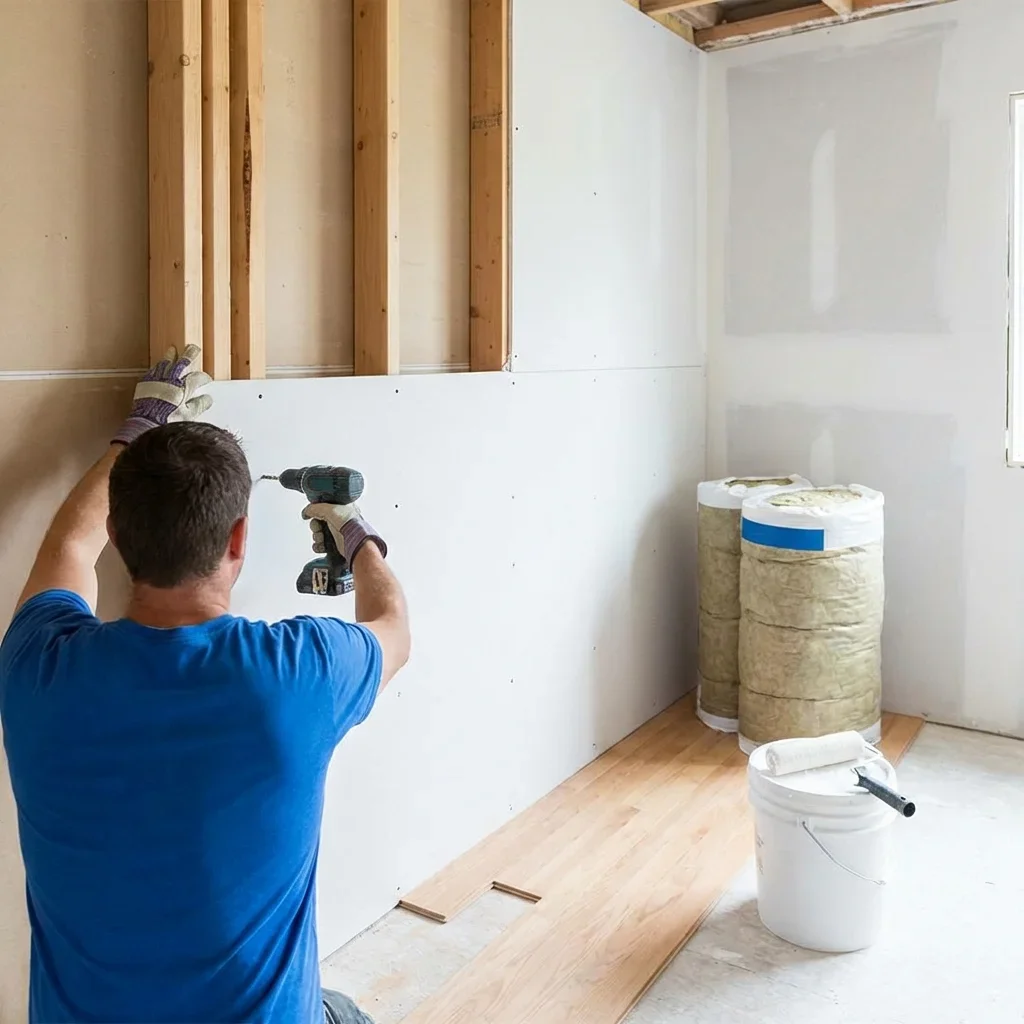
Restoration: Rebuilding Affected Areas
Clearance testing confirms the mold is gone, but your home isn't move-in ready yet. The restoration phase begins: replacing drywall, repainting, reinstalling insulation, replacing flooring, and rebuilding whatever was removed during remediation.
Some mold companies offer full-service restoration, handling everything from demolition to final paint. Others focus solely on remediation, requiring you to hire a general contractor for reconstruction. Full-service is often faster and simpler — one company, one point of contact, one warranty — but you'll pay a premium.
Separate contractors may cost less but introduce coordination headaches and potential finger-pointing if problems arise.
Restoration timelines vary widely based on damage extent. A single bathroom might take 3-5 days; a whole-house project can stretch 2-3 weeks or more. In Texas metros with rapid construction booms (Austin, San Antonio, Dallas-Fort Worth), contractor availability impacts scheduling. Book restoration early or confirm the remediation company has in-house crews.
During restoration, insist on moisture-resistant materials in areas prone to future problems. Mold-resistant drywall in bathrooms, moisture barriers in crawl spaces, and improved ventilation systems reduce recurrence risk. This is also the time to address underlying issues like inadequate attic ventilation or bathroom exhaust fans that dump moisture into attic spaces instead of outdoors — both common defects in post-2000 Texas tract homes built during rapid expansion.
Final Walkthrough and Documentation
Before the project closes, schedule a final walkthrough with the remediation and restoration crews. Verify that all work matches the original protocol and quote. Check that:
- All removed materials have been replaced and finished to match existing conditions
- Paint color matches surrounding areas (bring samples if needed)
- New drywall is smooth, taped, and primed
- Flooring is level and transitions match adjacent rooms
- HVAC systems are running properly if ducts were cleaned or replaced
- Moisture meters confirm building materials are fully dry
Ask for copies of all documentation: the original assessment report, remediation protocol, work logs, disposal receipts, clearance letter, and restoration invoices. If you filed an insurance claim, your insurer will need this complete package. Even if you paid out of pocket, these records boost your home's resale value and provide proof of professional remediation if future buyers raise concerns.
The company should also provide a warranty — typically 1-5 years depending on scope — covering their workmanship. Read the terms carefully. Most warranties are void if you fail to maintain moisture control (e.g., ignoring a new roof leak) or if unrelated water damage introduces new mold.
Warranties cover their work, not your ongoing maintenance responsibilities.
Preventing Future Mold Growth
Remediation removes existing mold, but staying mold-free requires vigilance. Your biggest allies are moisture control and routine maintenance. In Texas, where AC condensate and slab leaks are perennial problems, this means:
- Running dehumidifiers in high-humidity months (May-October in most of Texas, year-round in Gulf Coast regions)
- Inspecting HVAC drain pans and condensate lines quarterly — clogs cause overflow that soaks drywall and insulation
- Monitoring foundation for cracks or settling — expansive clay soil guarantees some movement; catch it early
- Testing slab moisture annually — moisture meters detect slow leaks before visible damage appears
- Ensuring bathroom and kitchen exhaust fans vent outdoors, not into attics or wall cavities
- Cleaning gutters and downspouts to direct water away from the foundation
- Scheduling annual mold inspections if you've had previous contamination or live in a high-risk area
For rental property owners, tenant education is critical. Provide written instructions on using exhaust fans, reporting leaks immediately, and avoiding behaviors that trap moisture (blocking vents, over-watering indoor plants, drying laundry indoors). A rental property mold inspection between tenants catches problems before they escalate.
If you're buying a home in Texas, especially post-Hurricane Harvey properties in Houston or homes in flood zones, get a pre-purchase mold inspection even if the seller claims no issues. Sellers are required to disclose known mold, but many don't recognize hidden contamination.
An independent inspection protects your investment.
What to Expect After Remediation: Health and Air Quality
One of the most immediate changes you'll notice after remediation is improved indoor air quality. Homeowners and building occupants consistently report feeling better — fewer headaches, less respiratory irritation, reduced allergy symptoms — within days of completing the process. This improvement is measurable: post-remediation air testing confirms spore counts drop to levels comparable to outdoor air.
For households with members who have asthma, allergies, or immune sensitivities, the difference can be dramatic. Children, elderly family members, and anyone with chronic respiratory conditions benefit most from professional remediation versus DIY attempts that often spread spores rather than contain them.
That said, some people experience temporary symptoms during the remediation process itself — especially if containment fails or they remain in the home during demolition.
This is why clearance testing is non-negotiable. Don't reoccupy treated areas until independent verification confirms it's safe.
Long-term, maintaining the air quality gains requires ongoing attention to moisture sources and ventilation. Consider indoor air quality testing annually if you've had mold issues before or live in a high-humidity region. Testing catches elevated spore counts before visible growth reappears, giving you a chance to address moisture problems proactively.
Understanding Costs and Insurance Coverage in Texas
Mold remediation costs in Texas vary widely based on contamination extent, accessibility, and materials affected. Small projects (under 10 square feet) may run $500-$1,500 if you can DIY safely. Moderate contamination (10-100 square feet) typically costs $2,000-$6,000 for professional remediation. Large projects (over 100 square feet or whole-house scenarios) can reach $10,000-$30,000 or more, especially when extensive restoration is required.
Insurance coverage for mold in Texas is notoriously limited.
Most standard homeowners policies exclude mold unless it results from a covered peril like a sudden pipe burst. Slow leaks, poor maintenance, and flooding (unless you have separate flood insurance) are typically not covered. Review your policy carefully and ask your insurer about mold endorsements or riders.
If you're filing a claim, document everything from first discovery through final clearance. Insurers require detailed evidence: photographs, moisture readings, lab reports, contractor estimates, and proof that you mitigated damage promptly. For guidance on navigating insurance claims, see our article on whether homeowners insurance covers mold in Texas.
Even without insurance coverage, investing in professional remediation protects your home's value and your household's health. Ignoring mold or attempting inadequate DIY fixes leads to more expensive repairs down the line — and potential liability if you sell without proper disclosure. For a detailed breakdown of typical costs, check out our mold remediation cost guide for Texas.
Choosing the Right Remediation Company
Not all mold companies are created equal. In Texas, start by verifying TDLR licensing for both the assessment and remediation companies. Unlicensed operators are common — and illegal — so don't skip this step. Ask candidates about their experience with homes like yours (slab-on-grade vs. pier-and-beam, age, construction type) and request references from recent projects.
Look for companies that:
- Employ IICRC-certified technicians (Industry standard for water damage and mold remediation)
- Carry appropriate insurance (general liability, pollution liability, professional liability)
- Provide detailed written estimates breaking down labor, materials, and restoration
- Offer both remediation and restoration services (or have trusted partners)
- Conduct independent clearance testing or coordinate with third-party assessors
- Communicate clearly about timelines, what to expect, and homeowner responsibilities
Red flags include companies that quote over the phone without inspection, pressure you to sign contracts immediately, or claim they can "guarantee mold won't return."
Legitimate companies know that guarantees depend on ongoing moisture control — something outside their control after they leave.
For more on evaluating contractors, read our guide on how to choose a mold remediation company in Texas and our list of questions to ask before hiring.
- U.S. Environmental Protection Agency (EPA). "Mold Remediation in Schools and Commercial Buildings Guide - Chapter 1." https://www.epa.gov/mold/mold-remediation-schools-and-commercial-buildings-guide-chapter-1. Accessed April 02, 2026.
- U.S. Environmental Protection Agency (EPA). "What are the basic mold cleanup steps?." https://www.epa.gov/mold/what-are-basic-mold-cleanup-steps. Accessed April 02, 2026.
- Occupational Safety and Health Administration (OSHA). "SHIB 03-10-10 A Brief Guide to Mold in the Workplace." http://www.osha.gov/publications/shib101003. Accessed April 02, 2026.